 From that point forward I have had a weather radio in the
motorhome. Not only that, but I have it mounted just behind the driver's door on the
wall. I can reach up while driving and flip it on.
From that point forward I have had a weather radio in the
motorhome. Not only that, but I have it mounted just behind the driver's door on the
wall. I can reach up while driving and flip it on.Wolf's Motorhome Modifications
... and Other Stuff
Mounting, Powering and Providing an Antenna for a Weather Radio!
On my second motorhome campout with my kids we had chance to be next to the playground. Shortly after arrival they became enthralled with swings and teeter-todders. Dad had a bit of time to play with his Amateur Radio (Ham Radio) walkie-talkie. Dialing in a local repeater, I was chagrined to hear a fellow yelling and hard to understand. Turned out he was watching a tornado on the ground and approaching his city. My trouble was, I had no idea where the repeater was. Could it be east of me and the weather have passed? Was it west and I was in mortal danger? It turned out, after about 9 minutes and 45 seconds, that the repeater callsign indicated it was to the east ... I was safe.
From that point forward I have had a weather radio in the
motorhome. Not only that, but I have it mounted just behind the driver's door on the
wall. I can reach up while driving and flip it on.
In most cases, it must be below 32 degrees for water hitting the road to freeze. Once you have a outdoor thermometer where you can see it when driving, you will be surprised at how you can forcast ice. Having a radio makes your ability to forcast problems all the better.
There are seven weather radio channels in use throughout the United States. That's more than there used to be! In addition, a new digitally directed radio, called SAME for "Specific Area Message Encoding", allows you to receive only warning for your area. It is important you get a seven channel radio. The digitally directed stuff is of little use to those as mobile as we are.
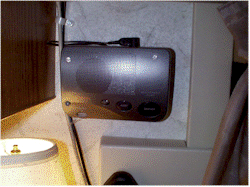
The important thing to look for is a radio that you can (1) turn on and off, (2) change channels and (3) turn alerts on and off ... WHILE THE RADIO IS MOUNTED TO THE WALL. If the frequency control is on the back of the radio, you won't be able to get to it.
Power
First you need to power the radio. A small 12 volt DC to 9 volt DC adapter is wired in and wired to the radio. Such a unit is carried by Radio Shack under catalog number 273-1802. I removed the metal plug parts from the part that goes into a cigarette lighter and soldered a wire directly to the leads. I ran that wire into a 12 volt DC source and buried the adapter itself in the base of a cabinet. The output comes through a small hole to the radio.
Mounting
The back to the radio is held on by four small screws. You will be remove the screws and drilling through both the back and front cover. You now have four mounting holes (and once the radio is mounted, the screws will hold the halves together). Using proper size drywall screws, attach the radio to the wall. An antenna jack is provided. I ran RG-174 coaxial cable to the antenna as it is but a few feet away. I drilled a small hole from inside a cabinet to where the antenna is to mount. Seal the inside of the hole with GOOP.
Antenna
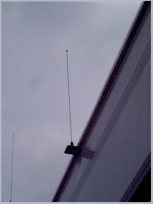 The radio would be
about worthless unless I had a GREAT antenna. You need to hear this thing on the
road, far from the normal range.
The radio would be
about worthless unless I had a GREAT antenna. You need to hear this thing on the
road, far from the normal range.
The antenna is mounted to the motorhome on a piece of steel bent 90 degrees. This mount is made by Larsen and can be purchased through most Amateur Radio outlets. On the part that attaches to the wall are two screw holes. The other park hosts a 3/4 inch hole. A Larsen LM-K antenna mount is secured in the hole and the wires from the radio attached to the mount. The antenna rod is cut to length. I did not worry about a ground plane and that proved wise as the antenna has been more than adequate for my needs.
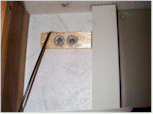 Two mounting holes are drilled through the sidewall of the
motorhome. These end up being inside a cabinet and out of view. Most sidewalls
are too weak to support an antenna mount. On the inside is mounted a piece of 1 x 2
inch wood that serves to distribute the load across a broader area. Again, seal the
insides of the holes with GOOP before you put the mount on.
Two mounting holes are drilled through the sidewall of the
motorhome. These end up being inside a cabinet and out of view. Most sidewalls
are too weak to support an antenna mount. On the inside is mounted a piece of 1 x 2
inch wood that serves to distribute the load across a broader area. Again, seal the
insides of the holes with GOOP before you put the mount on.
Sealing
In every case of sidewall delamination I have seen, there has been a water leak that was responsible for the damage. You best-better seal the whole mess VERY, VERY solidly. I took about a full tube of GOOP and coated virtually every component. GOOP is an insulator and immune to RF so it affects little.
Make sure you inspect the assembly every spring and fall! Re-seal it if you have ANY suspicion of a problem.
Put some GOOP on the insides of the bolts, too. It will keep them from vibrating off.
